Difference between revisions of "Player Housing"
PeskyCashew (talk | contribs) (→Artificing) |
|||
| (12 intermediate revisions by one other user not shown) | |||
| Line 6: | Line 6: | ||
== Lure Crafting == | == Lure Crafting == | ||
| + | [[File:Fishing_Table.png|300x300px]] | ||
| − | Inside of your Player House you will find a Lure Crafting Station. It's to the | + | Inside of your Player House you will find a Lure Crafting Station. It's to the right near the basement door, across the room from when you come in through the front door. There, you will see a table, with a stand with an empty hook on it, as well as a small chest next to the table. To begin, open the small chest and deposit the lure parts that you have collected into it. Upon doing so, you will see that the lure parts will appear on top of the table as 3D objects, with one object for each filled slot in the chest. Up to '''verify quantity''' 12 stacks of items may be deposited into the chest at once. |
Close the chest, walk over and grab the lure part with a free hand (using the Grip button), and place it on the empty hook. You will now see it appear on the hook! You can place up to three different ingredients on the same hook. You cannot put the same ingredient on the hook multiple times. | Close the chest, walk over and grab the lure part with a free hand (using the Grip button), and place it on the empty hook. You will now see it appear on the hook! You can place up to three different ingredients on the same hook. You cannot put the same ingredient on the hook multiple times. | ||
| − | Once you are finished making your lure, | + | Once you are finished making your lure, simply press the "Finish" button on the menu that appears next to the stand. You will see a crafting effect, and then the lure will reset back to empty. If you check your Inventory, you'll see that the crafted lure is now in your inventory in the first available slot. The icon for all Lures look the same, but you can view the tool tip to determine what type of Lure Parts are attached to each lure. If you make a mistake and wish to restart the process before hitting finish, just press the Cancel button in the menu. |
For more details on basic fishing, check out the [[Trade Skills#Fishing| fisherman guide]] | For more details on basic fishing, check out the [[Trade Skills#Fishing| fisherman guide]] | ||
== Dragon Breeding == | == Dragon Breeding == | ||
| + | [[File:Terrarium.png|300x300px]] | ||
| − | To the | + | To the left of the entrance to your house is the breeding terrarium. You can place two dragons in the chest and have them mate to produce offspring, potenially with unique traits and perks. Dragons can be purchased from players or the zoological gardens, but are rather expensive. |
To start, ensure that you have two dragons in a mood other than "Hungry." (You can view this by hovering over the dragon icon in your player menu and reading the tool tip that appears). Open the chest lid, place the 2 dragons you want to mate in the '''first two slots of the chest (left and middle)'''. | To start, ensure that you have two dragons in a mood other than "Hungry." (You can view this by hovering over the dragon icon in your player menu and reading the tool tip that appears). Open the chest lid, place the 2 dragons you want to mate in the '''first two slots of the chest (left and middle)'''. | ||
| Line 26: | Line 28: | ||
==Alchemy== | ==Alchemy== | ||
| + | [[File:Alchemy_Table.png|400x400px]] | ||
| − | Inside you house you will see an Alchemy Crafting table | + | Inside you house you will see an Alchemy Crafting table to your left immediately upon entrance from the front door. Next to the table is a small chest. Once placed in the chest, items will appear as a 3D model on the table itself, which you can pick up with a free hand like any other object. |
When you are ready to begin brewing your potion, simply pick up the first ingredient and toss it into the cauldron. The cauldron will boil and hiss, and you will see a notification appear (e.g. "+ Crownfoil") telling you the ingredient has been added. | When you are ready to begin brewing your potion, simply pick up the first ingredient and toss it into the cauldron. The cauldron will boil and hiss, and you will see a notification appear (e.g. "+ Crownfoil") telling you the ingredient has been added. | ||
| Line 40: | Line 43: | ||
As each stage is reached, you will hear a sound and see bubbles come off of the liquid, and the liquid will change colors. Depending on the recipe that you are making, you will then repeat the process, adding ingredients at various times based on the colors specified in the recipe. | As each stage is reached, you will hear a sound and see bubbles come off of the liquid, and the liquid will change colors. Depending on the recipe that you are making, you will then repeat the process, adding ingredients at various times based on the colors specified in the recipe. | ||
| − | Once you are finished making the potion, grab the empty bottle | + | Once you are finished making the potion, grab the empty bottle in front of the cauldron and dip it into the pot to finish the potion. A notification will appear telling you what you have made (for example, "Created Healing Potion"), and the potion will be added to your inventory. If you mess up the recipe, you will create a Ruined Potion, and the ingredients that you used will be lost. Note that the ingredients you put into the cauldron are used up as soon as you add them. |
===Potion Aging=== | ===Potion Aging=== | ||
| − | In farthest corner of the basement of your house, there is additionally a potion aging rack. Some potions may be placed here and left for times ranging from hours to weeks to become “aged” versions, increasing their potency or altering their effects. | + | [[File:Potion_Rack.png|200x200px]] |
| + | |||
| + | In farthest corner of the basement of your house, there is additionally a potion aging rack. Some potions may be placed here and left for times ranging from hours to weeks to become “aged” versions, increasing their potency or altering their effects. Up to 12 stacks of potions may be placed on the rack at once. | ||
For more details on basic alchemy, check out the [[Trade Skills#Alchemy|alchemy guide]]. | For more details on basic alchemy, check out the [[Trade Skills#Alchemy|alchemy guide]]. | ||
==Artificing== | ==Artificing== | ||
| + | [[File:Artificing_Table.png|350x350px]] | ||
| − | The artificing table in your home’s basement can be used to put tiles together to form tilesets. Putting tiles in the nearby chest, as always, puts 3-D models of te items on the table. Up to 12 stacks of items may be deposited into the chest at once. Tiles are created through the alchemy profession. Using ores mined throughout the land, the artificer can create individual tiles with their known recipes. Each tileset is created from a series of three to five tiles. A runic sight potion will enable others to see the runes you invoke in combat and tell you which runes you need. Artificing requires materials from all level regions and the tilesets are | + | The artificing table in your home’s basement can be used to put tiles together to form tilesets. Putting tiles in the nearby chest, as always, puts 3-D models of te items on the table. Up to 12 stacks of items may be deposited into the chest at once. Tiles are created through the alchemy profession. Using ores mined throughout the land, the artificer can create individual tiles with their known recipes. Each tileset is created from a series of three to five tiles. A runic sight potion will enable others to see the runes you invoke in combat and tell you which runes you need. Artificing requires materials from all level regions and the tilesets are expensive consumables, so it is thus considered a primarily endgame profession. |
For more details on basic artificing, check out the [[Trade Skills#Artificing|artificing guide]]. | For more details on basic artificing, check out the [[Trade Skills#Artificing|artificing guide]]. | ||
Latest revision as of 20:29, 30 May 2019
Each player owns an instanced home in which they can store items, create fishing lures, raise dragons as pets, brew and age potions, and create and use artificing tiles.
Storage Chest
The player owned storage chest has 7 tabs, each capable of holding 48 items or stacks of items. While the first 5 tabs come with the chest upon character creation, the 6th and 7th tabs must be purchased for 10,000 and 100,000 dram, respectively.
Lure Crafting
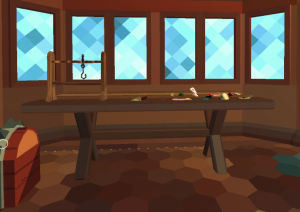
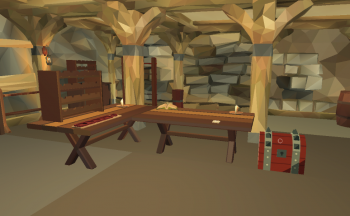
Inside of your Player House you will find a Lure Crafting Station. It's to the right near the basement door, across the room from when you come in through the front door. There, you will see a table, with a stand with an empty hook on it, as well as a small chest next to the table. To begin, open the small chest and deposit the lure parts that you have collected into it. Upon doing so, you will see that the lure parts will appear on top of the table as 3D objects, with one object for each filled slot in the chest. Up to verify quantity 12 stacks of items may be deposited into the chest at once.
Close the chest, walk over and grab the lure part with a free hand (using the Grip button), and place it on the empty hook. You will now see it appear on the hook! You can place up to three different ingredients on the same hook. You cannot put the same ingredient on the hook multiple times.
Once you are finished making your lure, simply press the "Finish" button on the menu that appears next to the stand. You will see a crafting effect, and then the lure will reset back to empty. If you check your Inventory, you'll see that the crafted lure is now in your inventory in the first available slot. The icon for all Lures look the same, but you can view the tool tip to determine what type of Lure Parts are attached to each lure. If you make a mistake and wish to restart the process before hitting finish, just press the Cancel button in the menu.
For more details on basic fishing, check out the fisherman guide
Dragon Breeding
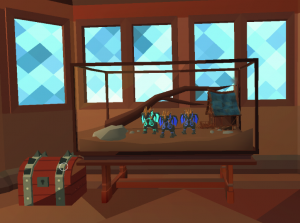
To the left of the entrance to your house is the breeding terrarium. You can place two dragons in the chest and have them mate to produce offspring, potenially with unique traits and perks. Dragons can be purchased from players or the zoological gardens, but are rather expensive.
To start, ensure that you have two dragons in a mood other than "Hungry." (You can view this by hovering over the dragon icon in your player menu and reading the tool tip that appears). Open the chest lid, place the 2 dragons you want to mate in the first two slots of the chest (left and middle).
It will then take 12 Hours from the time you place both the dragons in the chest to create an offspring. When the breeding process starts there will be a flame that appears between the two dragons in the terrarium. After the 12 Hour. period has lapsed, you will see the flame expired and the offspring dragon standing in front of its parents. You can then open the chest (using the Grip button) and remove the new dragon.
For more details on basic breeding, check out the dragon breeding guide.
Alchemy
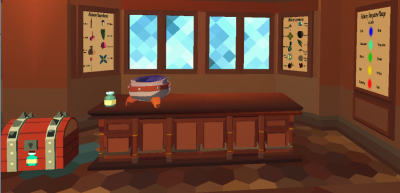
Inside you house you will see an Alchemy Crafting table to your left immediately upon entrance from the front door. Next to the table is a small chest. Once placed in the chest, items will appear as a 3D model on the table itself, which you can pick up with a free hand like any other object.
When you are ready to begin brewing your potion, simply pick up the first ingredient and toss it into the cauldron. The cauldron will boil and hiss, and you will see a notification appear (e.g. "+ Crownfoil") telling you the ingredient has been added.
After the first ingredient is added, the cauldron will begin to progress through a series of stages. The stages are:
- Cool (Blue)
- Lukewarm (Turquoise)
- Warm (Green)
- Hot (Yellow)
- Scalding (Red)
As each stage is reached, you will hear a sound and see bubbles come off of the liquid, and the liquid will change colors. Depending on the recipe that you are making, you will then repeat the process, adding ingredients at various times based on the colors specified in the recipe.
Once you are finished making the potion, grab the empty bottle in front of the cauldron and dip it into the pot to finish the potion. A notification will appear telling you what you have made (for example, "Created Healing Potion"), and the potion will be added to your inventory. If you mess up the recipe, you will create a Ruined Potion, and the ingredients that you used will be lost. Note that the ingredients you put into the cauldron are used up as soon as you add them.
Potion Aging
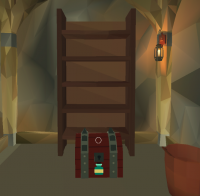
In farthest corner of the basement of your house, there is additionally a potion aging rack. Some potions may be placed here and left for times ranging from hours to weeks to become “aged” versions, increasing their potency or altering their effects. Up to 12 stacks of potions may be placed on the rack at once.
For more details on basic alchemy, check out the alchemy guide.
Artificing
The artificing table in your home’s basement can be used to put tiles together to form tilesets. Putting tiles in the nearby chest, as always, puts 3-D models of te items on the table. Up to 12 stacks of items may be deposited into the chest at once. Tiles are created through the alchemy profession. Using ores mined throughout the land, the artificer can create individual tiles with their known recipes. Each tileset is created from a series of three to five tiles. A runic sight potion will enable others to see the runes you invoke in combat and tell you which runes you need. Artificing requires materials from all level regions and the tilesets are expensive consumables, so it is thus considered a primarily endgame profession.
For more details on basic artificing, check out the artificing guide.
